Rainy Day At The Como Zoo Conservatory

Rainy Day At The Como Zoo Conservatory
Over the weekend we took a trip to the Como Zoo Conservatory.  I had been wanting to go for awhile, and the fact that it was raining didn’t stop me.  I really wanted to visit the conservatory, and a short trip through the Japanese Gardens could easily be done with some umbrellas.


Princess tried to climb into the fountain.  She LOVES playing in water.  Thankfully we caught her before she jumped in!

There were a lot of prom kids getting portraits taken all over the place.  There was also a bride and a groom in the sunken gardens, so we decided to come back so we wouldn’t be in their way.  
The sunken gardens are very beautiful.  They’re also full of lilies, which I’m allergic to.  I had my face mask so I could walk through without getting a migraine, but the smell seemed to bother Cat too.  Sadly, I think she might have inherited an allergy from me after all.  Thankfully, lilies are one of the easier allergens to avoid.  The worst thing is that she’ll have a rough time at funerals.  Thankfully, many people have red eyes and runny noses there, so she won’t be out of place.


The North Garden is my favorite.  It’s full of edible plants!  Depending on the time of year, you might even be able to spot something familiar growing.  I love peeking carefully through the leaves to see what treasures they hold.  The vanilla seemed to be overtaking the wall by the door.  Nate and I were amazed at how big it was!  We bought two cuttings of it from the gift shop in hopes of growing our own.
Cupcake was not a fan of this room.  She said it smelled like cat pee.  To be honest, it does smell a little when you first walk in, but then you get used to it.

We had a lot of fun at the Como Zoo Conservatory.  It was a lot more fun than being cooped up inside, at home, in the rain.  I kind of wish I had a beautiful indoor garden like the ones at Como, but I bet it takes a very large team and a lot of money to keep it looking as beautiful as it does.  I think I’m happy settling for a visit once a year and a few clippings of vanilla to take home with us.

Have you been to the Como Zoo Conservatory?  What is your favorite part?

52 Project, Week 11: Art

52 Project, Week 11: Art

Art can be so many different things!  There are thousands of different mediums and styles of art!  Choosing one form was incredibly difficult.  I am an artist, but I also enjoy the art of others.

The decision of making art of my own or finding a way to honor another person’s art was only mildly difficult.  I decided that since this was a mother/child project, it would be fun to make our own art.  We’ve always wanted to paint on canvases and this seemed like the perfect opportunity.  The whole family headed to Walmart where we picked up a few essentials.  Paint, canvases for the children and some paint brushes.   We also had a small pack of puzzles in our stash of art supplies from our local dollar store.  My own little canvas was also from the dollar store.

Each of the children enjoyed creating a masterpiece on their little canvases. Watching them create makes my heart happy.  In addition, I get to enjoy their beautiful art for years to come.

I decided to create an ombre blue base for my canvas project.  I started out by using the original shade of blue on the very bottom of the canvas.  Then I mixed the blue and white and added another stripe, I continued to add white and paint another stripe until the canvas was done.

After I let the canvas thoroughly dry, I moved onto the next step, glitter!  I found an image of an anchor online.  I printed it off and Cat cut it out for me to create a stencil.  Cat pressed the paper to the canvas and I painted the glue into the anchor shaped opening.  I heavily sprinkled the glitter onto the glue.  Cat removed the stencil.  We shook off the extra glitter onto a sheet of paper and poured the extra glitter back into its container.  I bought some spray adhesive that I’m going to use to keep the glitter from falling off.  Hopefully, this will keep it pretty for years to come!

What is your favorite way to create art?  Do you have a recent project to share with us?

Previous Week: 52 Project, Week 10: Mother/Daughter
Next Week: 52 Project, Week 12: Reflection
Main Page for 52 Project

52 Project, Week 10: Mother/Daughter

52 Project, Week 10: Mother/Daughter

Since this is a mother/daughter* project, it seemed obvious that there should be a mother daughter portrait for one of the challenges.  Though this photography project is mostly for Cat and me, I have invited all of the kids with us when we go out on our adventures.  Often, the other children get to jump in for a few portraits or get a chance to hold the camera.

The images of Cat and Me were both taken by Cupcake.  Cat and I both took portraits with the other kids and took turns being the photographer.  I’ve shared a few favorites and funny ones.  Life with 4 children is never boring!  Hahaha!

Some of these images were taken in my studio as a last photo shoot before closing my in-home studio.  The other ones are a walk we took on a warm day after the Sunday meeting.  Since it was so warm, there were a lot of other families out enjoying the warmer weather.  One family was kind enough to stop and take a portrait of all of us together, a rare treat.

I enjoy taking portraits with my children so that I am not an invisible part of their lives, in pictures anyway.  Too often I am the one taking a picture and not in it.  I’ve been trying to change this and ask other people to take a picture of me.

As a photographer, I see a lot of Mom’s since they’re the ones bringing the children in for photo shoots.  I usually ask the Mothers to jump in for a few portraits.  Some Moms are happy to jump in, excited to share in the moment.  Most Moms are shy and hesitant, slightly uncomfortable with the idea of being the center of attention.  Some Moms outright refuse to be in the portrait.

I’ve heard a lot of excuses over the years.  They’re heartbreaking to hear.
“I don’t have any makeup on.”
“I don’t look good.”
“I’m not dressed up.”
“I’m too fat.”
“I’m ugly.”
Usually, these are said with an outright honest and panicked frankness.  Some are said with a laugh to diffuse the tension.  All are said directly in front of their children.

Years ago I read an article that talked about how self-image was created in children.  It mentioned how children’s first role models are their parents.  What children hear their Mother’s say about themselves, becomes the inner voice of our children.  If we talk negatively about ourselves on a regular basis, our children hear that and internalize it.  If we talk positively about ourselves, we set a good example of confidence and self-love.

Our children look at us with love and adoration.  They don’t see our imperfections as imperfections.  They might or might not notice that our hair is messy, we don’t have makeup on, our clothes might be a size too small or too large or dirty from a hard day’s work.  They might or might not see the extra weight or lack of weight.  They might or might not see our wrinkles and grey hair.  To them, this is all part of a person they love very much.  To them, these things are all beautiful and fun.  Children see the INNER beauty shine through these beautiful characteristics that make us who we are. Children are not naturally judgemental.

I’ve had my children mention my “imperfections” to me as something they adore.
“Mommy, your tummy is nice and fluffy”
“Mommy, why do you put makeup on?  You look prettier without it.”
And my favorite…
“Mommy, I love you!”
They see the extra hugs and cuddles should they have a nightmare.  They see the smile when they look over for approval.  They hear my encouragement, my teaching, my singing, my laughter, and my love.  They see me making them meals and washing their clothes with a positive attitude.  They notice the good and not the bad.

Over the years, I’ve made a point to say positive things about myself in front of my children.  If I should look in the mirror and not like what I see, I make sure to say something positive out loud.  Instead of criticizing myself over my “imperfections”, I say “Look at my beeeautiful body!”  I usually say it in a silly voice with a little wiggle.  My children laugh and smile.  Instead of feeling down about myself, I too feel better and happier with who I am.

Seeing myself in pictures is not always easy.  I can see the things that make me look older as glaring reminders that I’m no longer young.  I resist the urge to edit these away with my awesome photo editing skills.  I don’t want my children to look back and see a perfectly retouched and unrealistic Mom.  I want them to see me as I am.  Hopefully, someday when they’re older, should they struggle with the same negative thoughts, they might look at a picture of me at their age and see that I’m not perfect either and hopefully it will make them feel better.

Do you hop in portraits with your children?  Do you have any pictures of you and your mother?

*Although this is a mother/daughter project, anyone can join in.  This can be a father/son, father/daughter, mother/son or other project.  If you don’t have a child, you can use your parent.  If you are away from your parent or child, you could use this as an opportunity to photograph what the parent/child relationship means to you.

Here are a few silly outtakes of our photo shoot.

Previous Week: 52 Project, Week 9: Ice/Snow/Frost
Next Week: 52 Project, Week 11: Art
Main Page for 52 Project

Homemade Bug Spray

Homemade Bug Spray

With summer right around the corner, I decided to whip up a batch of homemade bug spray.  With 4 little ones, I needed something that was 1.Safe to use on kids, 2.Safe for those of us with allergies 3.Non toxic, 4.Affordable and last but not least 5. It needs to actually work.  If it could also not smell horrible, that would be a plus.

I set about my project as I do with most new tasks to tackle, research, research, research.  I wanted to be sure that whatever I chose, it would meet all of my expectations above.

Safety

I have read a lot of differing information about the safety of using essential oils on children.  Some say that essential oils are natural, therefore go nuts!  As someone with allergies to a lot of “natural” things, I know that it is better to err on the side of caution.  Since essential oils are highly concentrated forms of the original, it only makes sense to me that less is more.  After reading about an alarming number of injuries and deaths from essential oils, I knew I wanted to proceed with utmost caution.  I joined a few essential oil safety groups on Facebook to learn about what books, websites, and companies would aid me in my search.

I found this awesome site that lists oils that are and are not safe for children:
http://www.usingeossafely.com/essential-oils-and-children/

Allergies

As with any new product that comes into our house, oils and accessories need to be safe for our unique allergies.  I wondered 1. How are they processed 2.What hidden ingredients are there 3. Has anyone else in my allergy group had any reported reactions?

Corn Allergy Statement
This recipe is unfortunately NOT corn free.  Thayer’s witch hazel uses citric acid as a preservative.  Princess and I do break out in mild hives if applied to the skin, so I try to spray mostly on our clothing, with a light application on exposed skin  Since we live in a high mosquito area, a few small hives are preferable to having entire limbs swell up from mosquito bites. Thankfully using this has not created any breathing problems, but we will always stay on alert for safety since the severity of allergens can change at any time.  I’m, hoping to learn how to make my own witch hazel in the future.

Non-Toxic

This is a no-brainer for me.  If it has ingredients I can’t pronounce, it’s off the list.  I believe part of why I am allergic to so many things and have been so sick in the past is due to the fact that I have been exposed to too many toxins.  I want to decrease the bucket load of toxins for my family and me.

Affordable

We live in Minnesota so we get a lot of mosquitoes.  I need something that I can afford to use a lot of.
Let me break down what making homemade bug spray costs for you.  I’m using Young Living, and also NOW for the prices.
8oz Bottle $2.00
15 Drops Lavender Essential Oil at 9 cents a drop $1.35YL or >2 cents a drop $0.23NOW
15 Drops Cedarwood Essential Oil at 5 cents a drop $0.75YL or >1 cent a drop $0.13NOW
10 Drops Geranium Essential Oil at 17 cents a drop $1.70YL or >3 cents a drop $0.28NOW
20 Drops Vanilla Essential Oil at 10 cents a drop $2.00
Young Living does not sell vanilla essential oil because vanilla is not an essential oil.  I instead used the price for the vanilla oil I got from my local health food store.
4oz Witch Hazel $3.03
4oz Distilled or Boiled(and Cooled) Water Free!

This ends up being $10.83 for the first bottle and $8.83 for each refill with Young Living.
Or $7.67 for the first bottle and $5.67 for each refill with NOW.
For a price comparison
Burt’s Bees Outdoor all Natural herbal Insect Repellent 4oz bottle $13.50= $27.00 for 8oz
Honest Co Bug Spray 4oz $11.69= $23.38 for 8oz
BabyGanics Shoo Fly Deet Free Natural Insect Repellent 2 oz $4.99= $19.96 for 8oz

So there you have it!  Homemade bug spray wins the price comparison again!

Effective

I sprayed the kids at the beginning of mosquito season as they went out to jump on the trampoline at dusk.  They came in with one bite on one kid.  Earlier this week we had a bonfire.  Cupcake and I stayed out the longest.  I sprayed myself an average amount of spray.  I was wearing a skirt, so my legs were pretty exposed.  I did get one bite on my foot and after that, I made sure to spray my feet too.  I didn’t get another bite after that.  I was lying in a lounge chair and I saw several mosquitoes fly around me and close to my skin before changing their mind and flying off.  Incredible!  I’d definitely say that it’s effective!

I read that adding vanilla oil increases the duration of the effectiveness of oils.  In bug spray, the longer it works, the better!

Comforting

What is more comforting than not being eaten alive?  Seriously, I have been bug bait my whole life, mosquitos love me.  I’m so happy I’ve finally found something that works!

I was worried the smell would be gross after mixing everything in the bottle.  It’s actually quite pleasant.  It smells better than all of the chemical ones I’ve been using my whole life.

First Homemade Bug Spray Attempt

Ultimately, I decided to give one of the oil blends from this site a try:
http://blog.oneessentialcommunity.com/diy/diy-bug-spray-works-kid-safe-options/
After assembling all of the supplies, I waited anxiously for my daughter to arrive home from school.  I promised her we would make the first batch together.  I had everything set up and ready to go on the table and I pretty much sat at the table waiting for her to walk through the door so we could play.  Ahhh, big kid toys are just as fun and exciting.

We started by dropping oils into our bottle, stopping to smell each one as we went.  Cat helped me count in case I lost my place.  I had already boiled and cooled the water before she came home, so we added that in and topped it off with witch hazel.  After we shook it up we both excitedly took a whiff of our new concoction and grimaced.  It didn’t exactly smell awesome.  It wasn’t horrible, but it wasn’t very pleasant either.  Oh well, it is supposed to repel bugs after all.

Next time, we are going to try lavender scented witch hazel instead of aloe vera.  I believe this might have contributed to the weirdness.
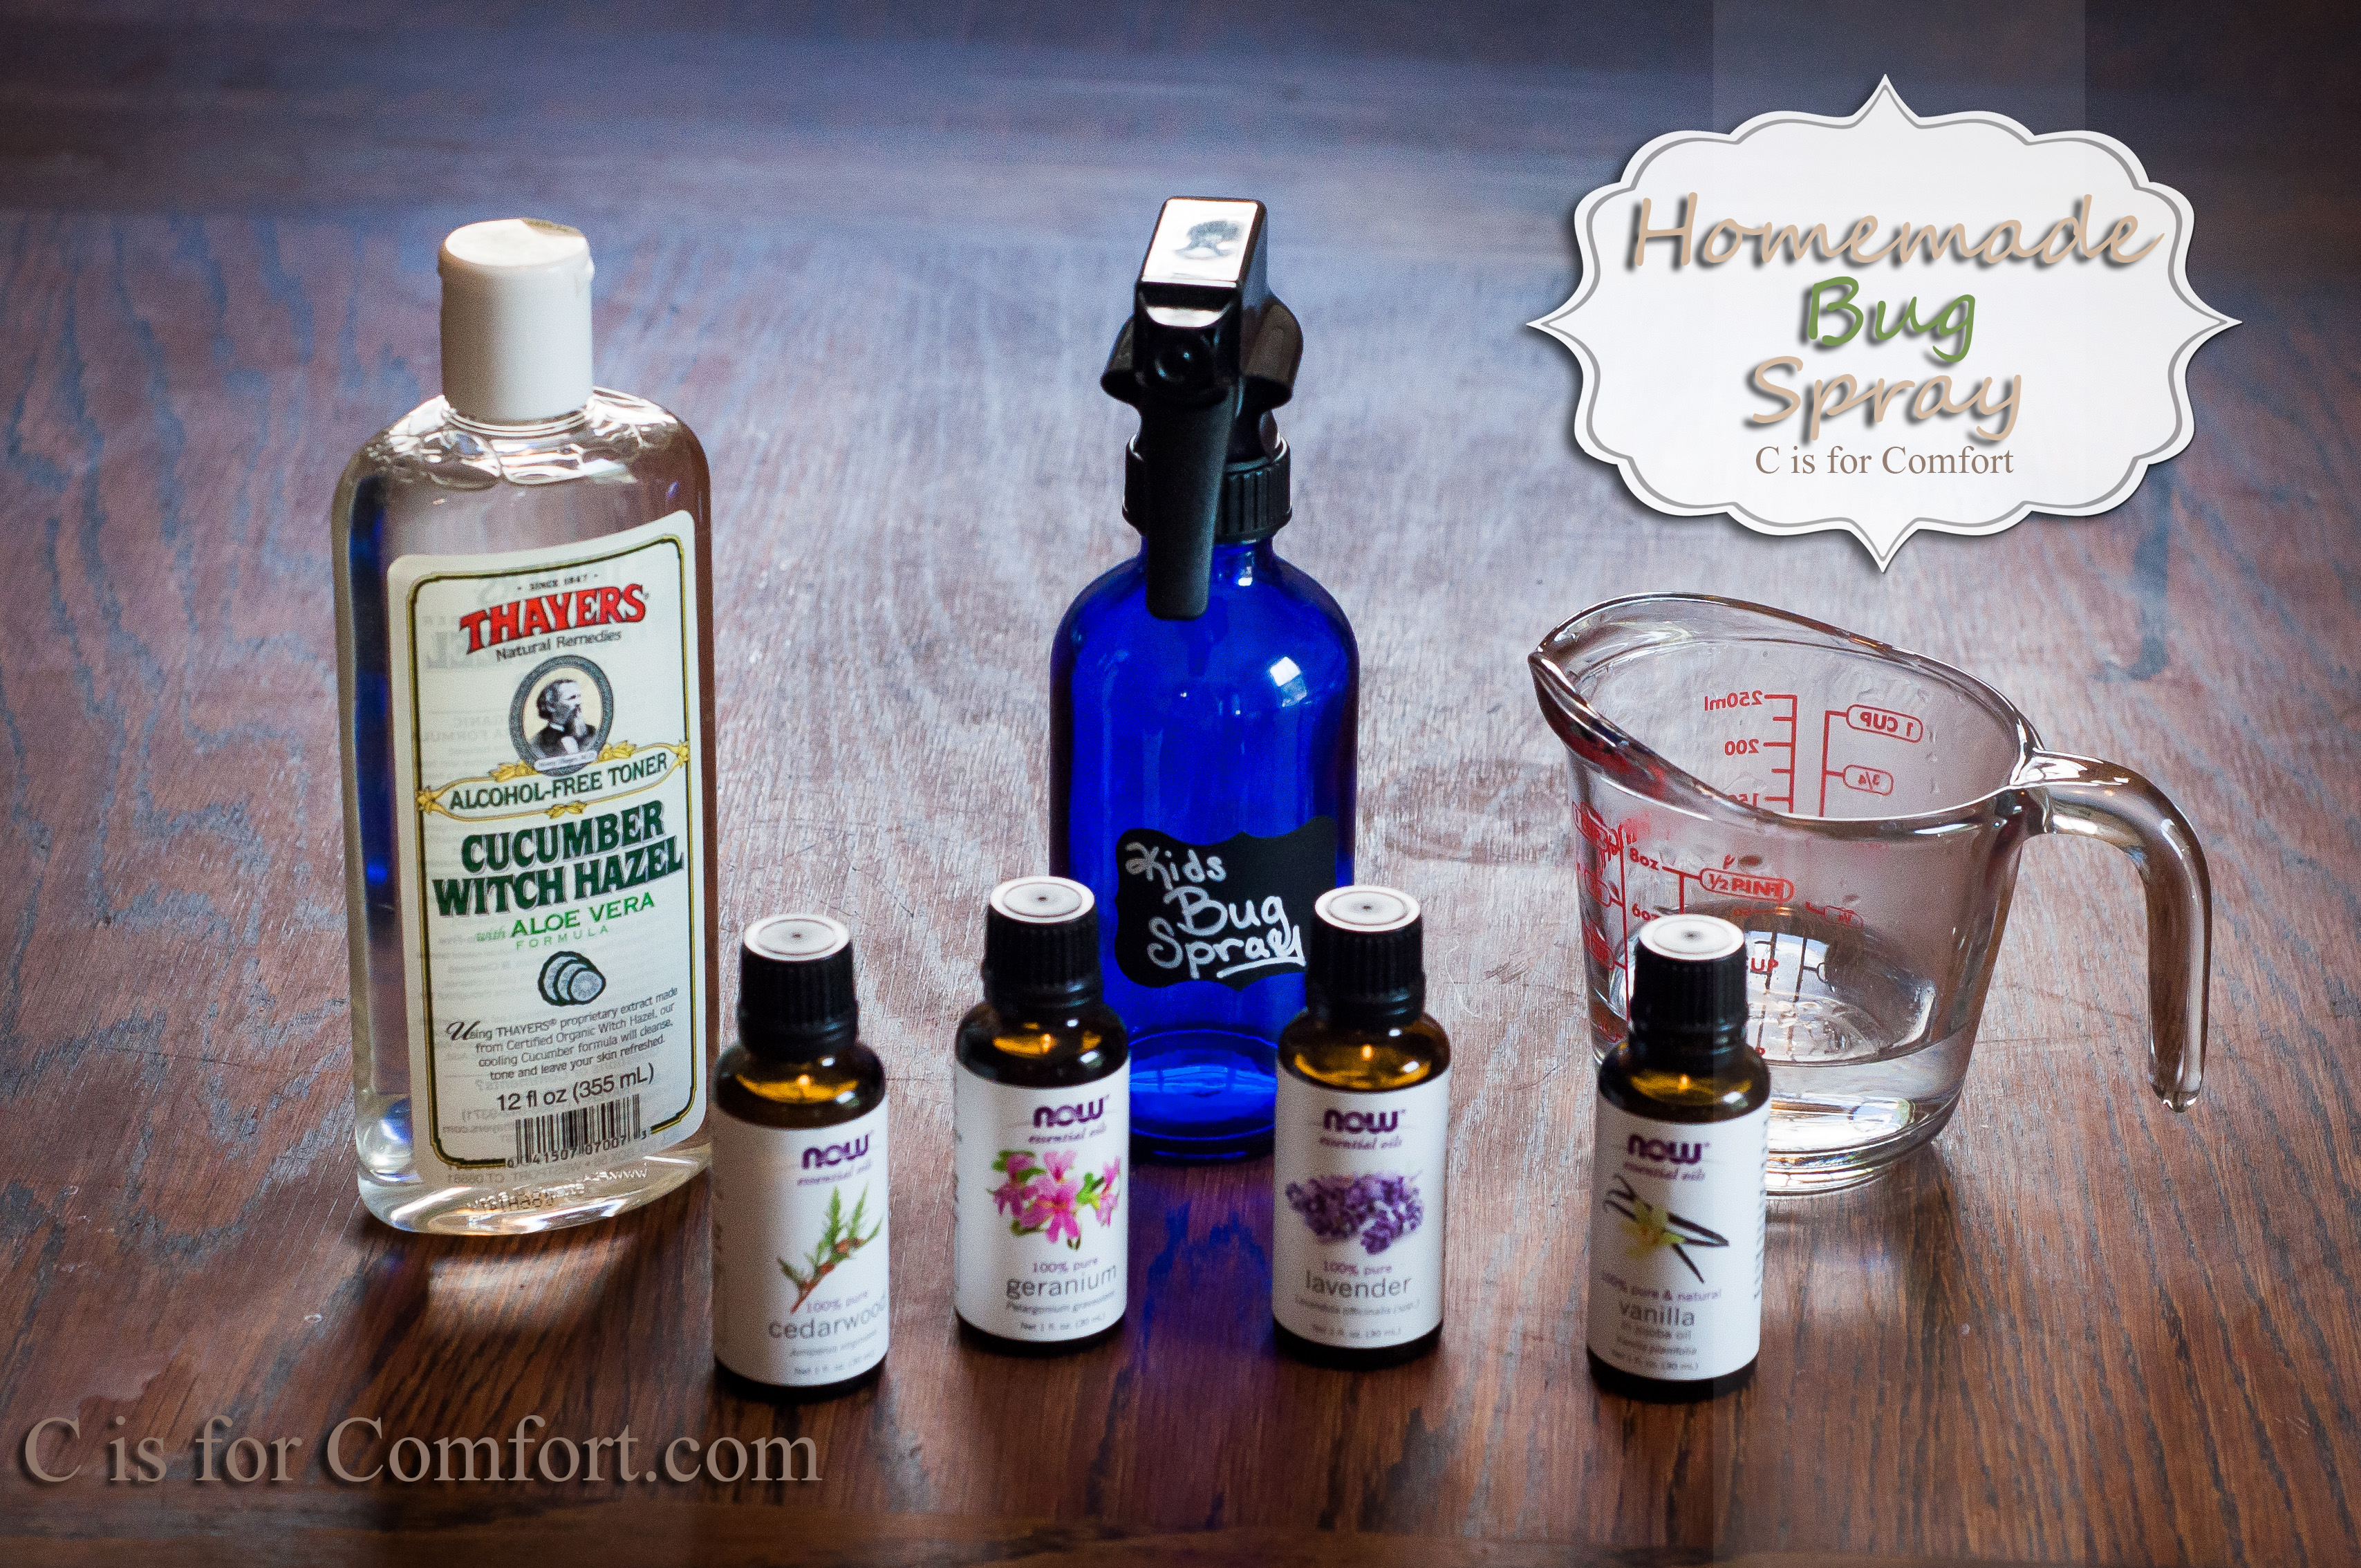
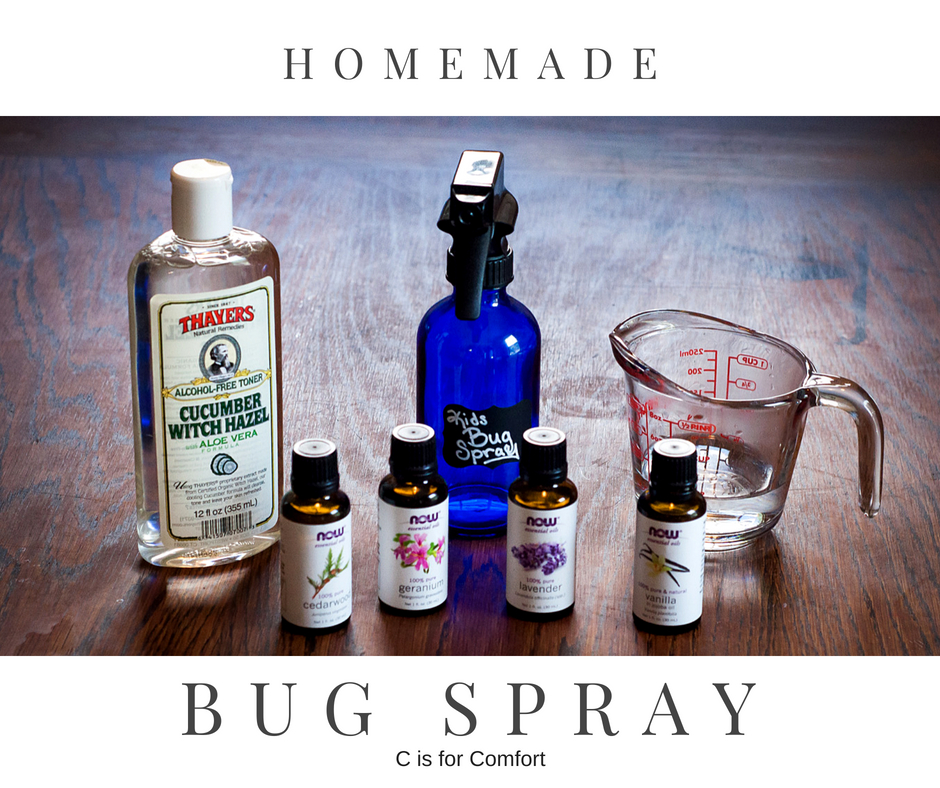
Homemade Bug Spray

Homemade Bug Spray

8oz Bottle
15 Drops Lavender Essential Oil
15 Drops Cedarwood Essential Oil
10 Drops Geranium Essential Oil
20 Drops Vanilla Essential Oil or 1/2 tsp Vanilla Extract*
4oz Witch Hazel
4oz Distilled or Boiled(and Cooled) Water

Add Oils to bottle first.  Add in water next, then top off with witch hazel.  Test a small area of skin on each person before using liberally.  Spray on clothes and especially ankles and wrists for adults.  With small children, avoid spraying hands or near faces to avoid accidental ingestion or rubbing eyes.

*Vanilla oil is not an essential oil

Thank you for reading!  What do you use for bug spray?  Have you tried ours?  I would love to know how it works for you!


As always, this is not medical advice.  Please consult your own medical practitioner for any health-related concerns.  Everything shared in this blog is based on my own personal experiences and are what we do for our family but may not necessarily work for yours.  Please do your own research to find out what works best for you.  An informed and educated choice is always best!  🙂

15 Fun Chalk Art Ideas

It’s chalk art season, time to check out our 15 fun chalk art ideas! The snow has melted, the sun is shining and it’s warm enough to go outside without snow pants, mittens, and hats.  

One of our favorite summer activities is to make chalk art.  Maybe we’re artistically inclined.  Or maybe we’re rebels and we enjoy defacing public property.  Really, though, we love making art to share with others.  What greater way is there to spread a little cheer to your neighbors?

My children love when I break open a new package of chalk.  The rainbow of colors, the excitement of possibilities, the opportunity for art! I love seeing their excitement.

My kids aren’t the only ones that love to draw with chalk!  I usually join them and create a fun doodle or two.

There are so many different things that can be done with chalk.  From simple to extreme, there are many beautiful examples out there to inspire us.  Here are a few ideas to get your creative juices flowing.

15 Fun Chalk Art Ideas

15 Fun Chalk Art Ideas

  1. Family Portrait
  2. Stencils
  3. Flowers
  4. Name Art
  5. Wings
  6. Beach
  7. Super Hero
  8. Celestial-Suns, Stars, Moons, and Planets
  9. Quotes
  10. Outlines
  11. Crowns, Hats, & Hair
  12. Rainbow
  13. Camping
  14. Flying Away in the Clouds with a Balloon
  15. Sunsets

What are your favorite things to do with chalk?  Were you inspired by this post?  Share some of your art with us!

Check out our fun Chalk art video!

Fun Things To Do, At Home, Outside, In Summer

Fun Things To Do, At Home, Outside, In Summer

What a title!  This is the first in a series of fun things to do.  I plan on posting many more for all the seasons.  I’m dividing these up specifically so that it’s easy to find something fun to do, no matter the circumstances.

For this part in the series, I’m focusing specifically on fun things to do, at home, outside, in summer.  I don’t know about you, but some of my best memories of childhood take place outside.  I can remember running through the streets with all of the other kids on my block.  We were completely unsupervised and free to use our imaginations.  I honestly can’t remember my Mom guiding our play.

Unfortunately, in today’s world, it is not safe to let the kids run free and wild outside.  Sadly, I’ve heard many stories in the news about parents being investigated by CPS if children are allowed to walk to the park themselves.  I know that in today’s world, children are being kidnapped and sold, so a simple walk to the park is a thing of the past.  If you’re like me, you want your babies to be safe AND have fun.  So this means that the kids might be contained to the yard.

Usually, I let my kids outside to play on the trampoline and all the neighborhood kids will come running over.  However, there are days when no friends can come to play.  If this is the case, I turn to my handy list of things to do.

Here is a free summer fun printable.  I like to keep mine inside a plastic protector sheet inside a binder.  I’ve seen a lot of fun ideas about putting the lists on popsicle sticks and the like.  Although that idea is neat, for me, it just means a lot of work.  Not to mention more clutter and the chance that the kids will lose, break, eat, leave lying around the house, etc.

fun things to do outside at home list -1

Here are a few 8.5×11 summer fun printout freebies.  I made these with Tagxedo, but you could always make your own with your favorite summer activities.

fun things to do at home outside 8.5x11 fun things to do at home outside 8.5x11-2 fun things to do at home outside 8.5x11-3 fun things to do at home outside 8.5x11-4

For more information and ideas for these activities, check out the links below. Over the Summer I’ll be picking randomly from this list, so check back often!

  • Archery
  • Backyard Camping
  • Backyard Fort
  • Backyard Picnic
  • Basketball Games
  • Bike Ride
  • Blow Bubbles
  • Cartwheels
  • Chalk Art
  • Climb Trees
  • Color or Paint Pictures of Nature
  • Drink Ice Tea and Relax
  • Eat a Meal Outside
  • Eat Watermelon Slices
  • Freeze Tag
  • Gardening
  • Gaze at Stars
  • Have a Bonfire
  • Have a Relay Race
  • Have the Kids Plan and Set Up a Photo Shoot
  • Hopscotch
  • Hula Hoop
  • Invite Friends Over
  • Jacks
  • Jump Rope
  • Kick the Can
  • Lemonade Stand
  • Make and Grill Shish-Ka-Bobs Together
  • Make and Put Up a Birdfeeder
  • Make Dandelion Crowns
  • Make Friendship Bracelets
  • Make Paper Airplanes
  • Make S’mores
  • Marbles
  • Nature Scavenger Hunt
  • Obstacle Course
  • Off the Grid Day
  • Paint Nails
  • Paint Rocks
  • Photo Shoot of the Family
  • Photo Shoot of the Kids
  • Play Don’t Touch the Ground
  • Play Frisbee
  • Play in Kiddie Pool
  • Play With Neighborhood Friends
  • Playing Catch with a Baseball
  • Read
  • Red Rover
  • Safety Drills
  • Sketch
  • Soccer
  • Sprinkler
  • Swing
  • Tag
  • Take a Nap
  • Take a Walk and Watch the Sun Rise
  • Take a Walk and Watch the Sun Set
  • Take Pix of Each Other
  • Throw a Theme Party
  • Trampoline
  • Treasure Hunt
  • Walk to the River
  • Wash the Car
  • Watch the Clouds
  • Watermelon Skewers

What are your favorite fun things to do, at home, outside, in summer?  We’d love to hear from you!  Let us know in the comments!