Traditional Medicinal Teas

Traditional Medicinal Teas

I love Traditional Medicinal teas for so many reasons.  They’re allergy friendly, organic, high quality, formulated by herbalists, they go through 9 levels of quality control testing and they’re delicious!  I am not getting paid to say any of this, I simply love them.  They contribute to the good health of my family and that is worth sharing.

Almost all of the Traditional Medicinal teas are corn free.  This is rare and wonderful.  Every other brand I’ve ever tried has been corn-taminated in some way.  Having safe, guilt-free, pain-free beverages is such a blessing.  Some days, post allergy exposure, I live on nothing but tea.  Without them, I would be left with only water, which is good, but it doesn’t fill my appetite.  Plus, the tea helps my body heal and recover.
dsc_0740

I’ve read some articles  about the large amount of teas on the market being heavily sprayed with pesticides.  In addition to that, the tea bags themselves are also highly toxic!  In response, some companies have gone organic (but not corn free) or have tried using less toxic bags (made from corn).  Thankfully, Traditional Medicinals are the best quality I’ve found.  They are both corn free and non-toxic.

I’ll run you through a few of my favorites and how I use them.  Some teas we drink daily and some are once a week or seasonally.  Some we drink for pure enjoyment and others are for specific health reasons.  You don’t have to only drink them for their medicinal properties, you can simply have them for the joy of it!

Gypsy Cold Care

Traditional Medicinals Seasonal Sampler
This is one of my favorites.  I’ve listed it first because this one not only tastes good, but the health benefits are amazing.  I started drinking this after my mother gave me the Seasonal Sampler box when I was sick.  It really helps kick the cold out.  Whenever I’m afraid one of the kids or I’m coming down with something, I brew up a cup to chase away the illness.  I like it plain and sometimes with honey.  I find it doesn’t need honey and I almost never use it with this tea anymore.

Breathe Easy

Traditional Medicinals Breathe Easy Tea
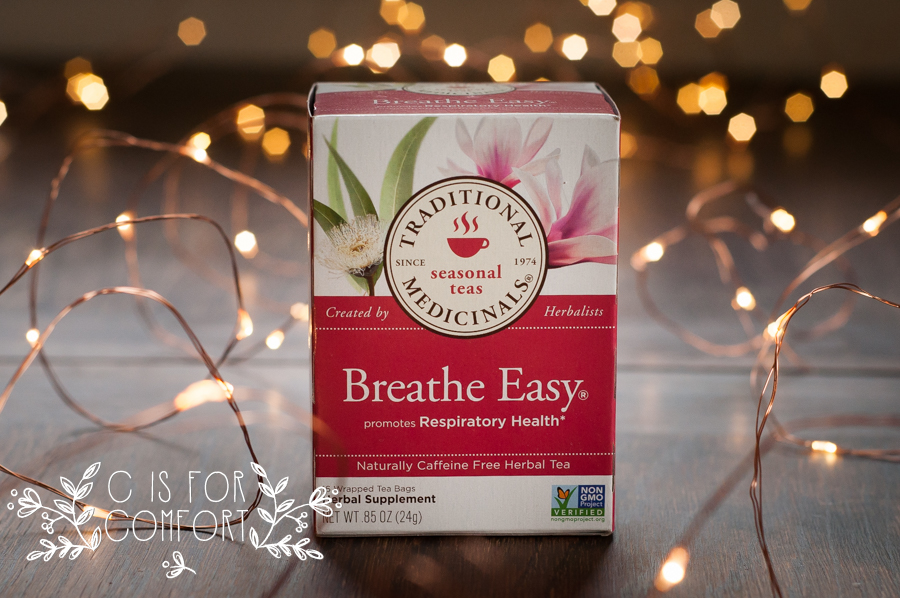
I’m listing this one second because I feel it’s incredibly important.  With my asthma and my earlier in life penchant for coming down with pneumonia at the drop of a hat, breathing is very important.  If I get a cold with a cough or I have allergy exposure that makes it difficult to breathe, this tea is a lifesaver.  I’ll make a nice steamy cup, cradle it in my hands, bend over the cup and breathe in the steam.  After it cools I’ll sip it slowly to try and prolong my exposure.  I do enjoy honey in this one.  Honey is great for breathing problems too.

Roasted Dandelion Root

Roasted Dandelion Root Traditional Medicinals
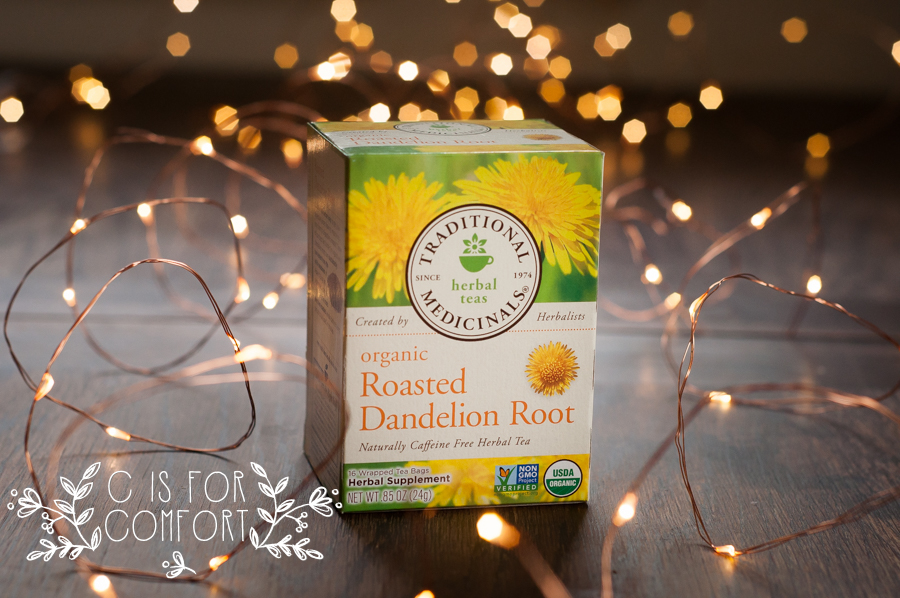
This is my current favorite.  I haven’t been able to find corn-free coffee.  I love coffee, but if I cheat and drink some, I get incredibly sick.  I actually bought this tea because it was on sale and I had been meaning to try it for its health properties.  Dandelion root is amazing for detoxifying the liver.  Once I tasted it plain, a light bulb went off over my head, it tasted like coffee!  Since then, I have not had a single drop of coffee.  I drink roasted dandelion root “coffee” every day, it’s so good.  I add a little local 100% pure maple syrup and local organic grass fed heavy whipping cream.  I have made it for my kids, my family and friends and they all agree with me that it’s amazing.

Throat Coat

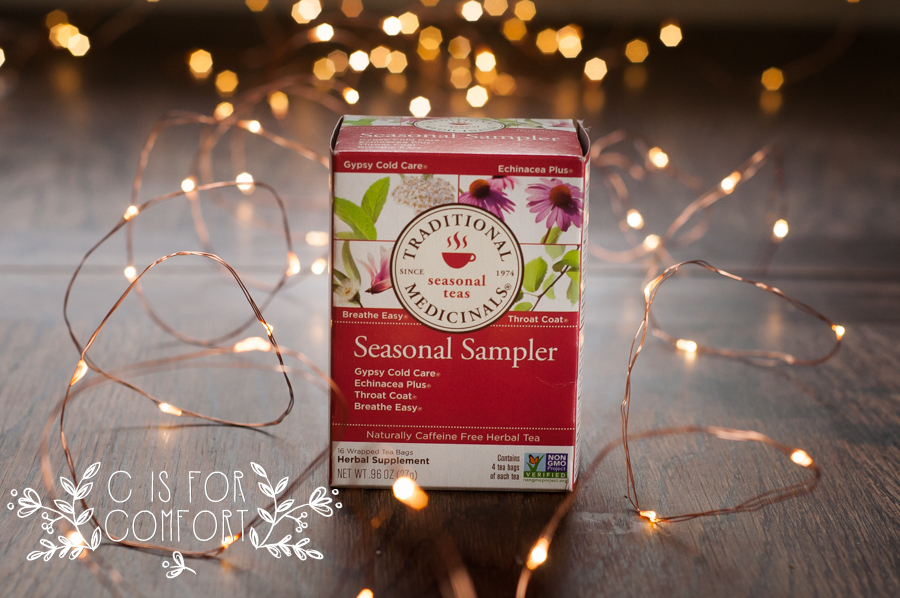
This tea is fantastic for sore throats.  I think it tastes great, especially with honey.  However, my kids are not big fans.  They usually complain when I make them a cup.  I add extra honey so they’ll drink it.  I don’t feel guilty about extra sugar, honey helps to soothe and heal sore throats.  Thankfully, this one is part of the seasonal sampler, if you’d like to try a variety of their teas.Traditional Medicinals Seasonal Sampler

Echinacea Plus

Traditional Medicinals Seasonal Sampler
If you don’t already know, echinacea is amazing for immune system support.

Lavender Chamomile

Traditional Medicinals Chamomile with Lavender
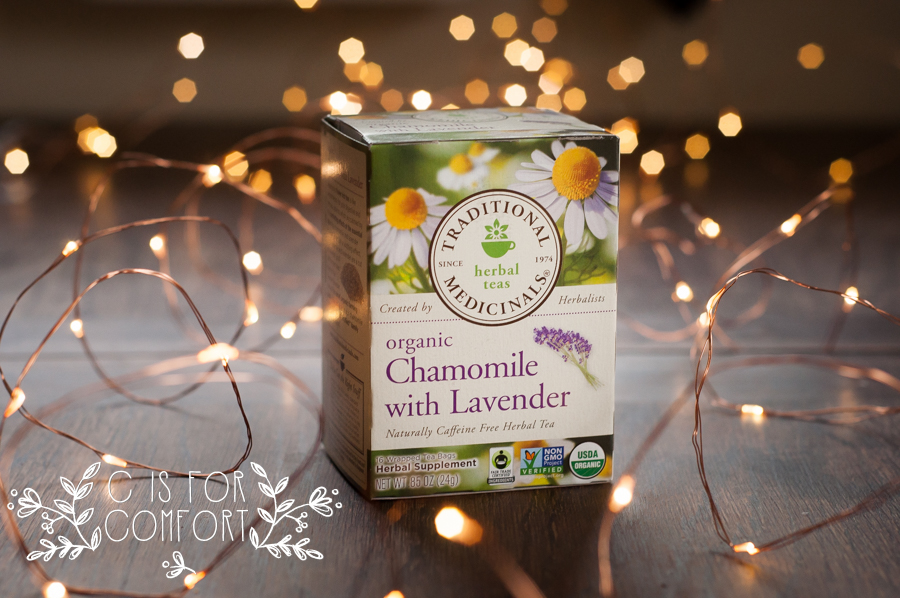
When I first saw this tea, I was really excited to try it.  I love lavender.  I had been looking for a good chamomile to help me relax before bed or when I feel stressed out.  This one is soothing and perfect for both of those.

Hibiscus Green Tea

I have read great things about using hibiscus for a healthy heart and also as a vitamin C source.  I needed a safe, corn free green tea and went searching for one that was allergy friendly, non-toxic, and affordable.  When I stumbled across hibiscus green tea, from traditional medicinals, I was excited to give it a try.  It’s a bit more tart than I expected.  I use honey and cream to sweeten it.  I’m going to make my next batch of Kombucha with it for a little variety.


There are many other great blends made by Traditional Medicinals.  I hope that this inspires you to give them a try!  Do you drink Traditional Medicinals?  What is your favorite?  Have you tried any of my favorites for yourself after reading this?  Let me know!  🙂

Gluten Free Berry Muffins

Gluten Free Berry Muffins

When I was first learning how to be corn and wheat free, my sister in law made me some amazing gluten-free berry muffins.  She was kind enough to share her recipe with me.  I’ve modified it a bit since our allergies have evolved.  My whole family loves these and we try to always have some on hand.

Thankfully, they are freezer friendly, so we can make double or triple batches, freeze the majority and still have enough left to snack on for a few days.  I recommend freezing immediately what you can’t eat and whatever is left eat within one to two days.  After 48 hours they lose their flavor and fluffy texture.

The nice thing about this recipe is, you can add whatever fruit you have on hand.  We’ve tried many different combos over the years, but my favorite is one my SIL came up with, lemon zest and raspberry.  More recently we tried lime juice and blackberries.  Sometimes we’ll chop up apples or throw in fresh blueberries.  My SIL has also made a delicious peach mango.  If you’re craving chocolate, you could always add chocolate chips.  For those of you with corn allergies, just adding cocoa powder and a little extra maple syrup is a good alternative to chocolate chips.

I have always loved the top of the muffin.  Panera makes amazing pumpkin muffies, which are basically large muffin tops.  Since learning about all of my allergies, I’ve always been bummed I can’t drop by for a muffie.  I did discover a muffie pan at Target a few years ago and I’ve loved using it for my muffins.  I use that and regular muffin tins since I usually make triple or quadruple batches and I need all the pans I can get!  My next goal is to replicate the muffie in a gluten-free recipe!

I hope you enjoy these muffins as much as we do!  Let me know if you try and enjoy the recipe!

Gluten Free Berry Muffins

Gluten Free Berry Muffins

Gluten Free Berry Muffins

Makes 12 regular sized muffins or 6 muffies

Ingredients
  • ½ cup unsalted butter, room temperature
  • 2 tsp. lemon zest or more — zest from 1 large lemon
  • 1 cup real maple syrup or 1 cup of sugar
  • 1TBSP granulated sugar**
  • 1 egg or egg substitute(I use chia seeds)
  • 1 tsp. vanilla (omit if you don’t have homemade for corn free people)
  • 2 cups gluten-free flour blend (set aside 1/4 cup of this to toss with the berries)
  • 2 tsp baking soda
  • 1 tsp cream of tartar
  • 2 tsp xanthan gum (I also use chia seeds instead)
  • 1 tsp. sea salt
  • 2 cups fresh berries
  • ½ cup buttermilk*** (or milk alternative, making buttermilk is optional)

** This 1 tablespoon is for sprinkling on top

*** To make homemade buttermilk, place 1 tablespoon of apple cider vinegar or lemon juice in a liquid measuring cup. Fill the cup with milk/milk alternative until it reaches the 1-cup line. Let stand for five minutes. Use only 1/2 cup of the prepared mixture for the recipe.

Instructions
  1. Preheat the oven to 350ºF.
  2. Cream butter with lemon zest and the cup of the sugar/maple syrup until light and fluffy.
  3. Add the egg and vanilla and beat until combined.
  4. Meanwhile, in a separate bowl, toss the berries with ¼ cup of flour.
  5. Whisk together the remaining flour, baking powder, and salt in a separate bowl.
  6. Add the flour mixture to the batter a little at a time, alternating with the buttermilk.
  7. Fold in the berries.
  8. Grease muffin tins with butter. Fill 3/4 full with a spoon.
  9. Sprinkle batter with remaining tablespoon of sugar.
  10. Bake for 35 to 45 minutes. Check with a toothpick for doneness. If necessary, return pan to oven for a couple of more minutes. (Note: Bake up to 10 minutes more depending on climate) Let cool at least 15 minutes before serving.

DSC_0052

Gluten Free Strawberry Rhubarb Crisp Bars

Gluten Free Strawberry Rhubarb Crisp Bars

Gluten free strawberry rhubarb crisp bars are one of the best spring and early summer desserts!  Strawberries and rhubarb are in season in May and June in Minnesota, so if you’re looking to cook and bake seasonally, this would be a great time to use them!

If you have an abundance of strawberries and rhubarb in your garden, you could always chop them up and put them in ziplock bags in the freezer.  Then you can make this later in the season too!

When I saw rhubarb at the farmer’s market this last weekend, I immediately thought of my Grandmother.  As a child, I would often snack on rhubarb from her yard.  This will be the first year I get my rhubarb from the farmer’s market instead of my Grandparent’s garden, a bittersweet moment.

Last year, my grandparent’s house was sold.  This was the place that I grew up in, next to my own home.  It was where all of the best childhood memories happened.  It was where my Grandparents made me feel like I was someone who mattered.

I know that farmer’s market rhubarb will be just as good as Grandma and Grandpa’s.  However, there will be a little part of my heart that will always cry and smile at the same time at any mention of rhubarb.

After I brought the rhubarb home I thought immediately back to my childhood days again.   My Father would always make a delicious rhubarb crisp.  Unfortunately, my Dad’s recipe was not gluten and oat free.  Determined to have one of my favorite childhood desserts, I set about scouring the internet for a decent alternative.

Sadly, I didn’t find any recipe that fit my needs, so I improvised.  It turned out great!  So great, in fact, that I gobbled up almost the entire thing myself!  My kids were not happy with me.  Ha!

The next time I make this, I’m going to make 2 at once.  Maybe the kids will get a piece or two.

I hope you love my recipe!  Let me know if you try it!

Gluten-Free Strawberry Rhubarb Crisp Bars
Serves 12-16
Shortbread Base
2 sticks unsalted butter, room temp
3/4 cup brown sugar or maple syrup
2 cups gluten-free flour mix

Crisp Topping
1/2 cup gluten-free flour mix
3/4 cup brown sugar or maple syrup
1/2 cup almond meal (optional)
6 tbsp unsalted butter(cubed about 1/2 TBSP chunks)

Strawberry Rhubarb Center(Prepared Last)
12 ounces or 2 cups of quartered strawberries
12 ounces or 2 cups of chopped rhubarb
2 tbsp sugar or maple syrup
1/4 cup gluten-free flour mix

Shortbread Base
Preheat over to 325.  Grease 9×13 pan, line with parchment paper (optional), grease again.  Blend butter and sugar well.  Add in flour until smooth.  Press dough into a pan.  Bake for 25 minutes.  Remove from oven.  Increase over to 350.

Crisp Topping
Blend flour, brown sugar, and almond meal.  Add butter and mix until crumbly.  Chill in refrigerator.

Strawberry Rhubarb Center-Make Last
Chop rhubarb into 1/2 inch pieces.  Quarter strawberries.  Toss with sugar and flour.  Immediately spread over shortbread.  Use hands to crumble crisp topping over strawberry rhubarb mixture.  Bake for 25 minutes.  Turn off oven and allow to remain in oven for additional 5 minutes.  Remove from oven to cool.  Once the pan is cool, you have two options.  1. Refrigerate for more solid bars to transport and display for a party or 2.Eat immediately if you enjoy them warm!  Add a scoop of vanilla ice cream.  Enjoy!

Strawberry Rhubarb Crisp Bars
Strawberry Rhubarb Crisp
Best Dessert EVER
Strawberry Rhubarb Crisp

Guilt-Free Cookie Balls

Guilt-Free Cookie Balls

I’m not sure that naming these “Cookie Balls” sums up how delicious and nutritious these little treats are.  Not only are they full of natural vitamins, minerals, protein, and fiber, they taste like something one should feel guilty over.  Thankfully, unlike classic cookies, these will leave you feeling full and satisfied, without the guilt.

Nutritious, Guilt Free, Cookie Balls
Cookie Balls

I discovered that these work wonders for morning sickness.  I had heard that protein can help lessen morning sickness.  So with my last pregnancy, I made a large batch of these and snacked on them whenever I started feeling nauseous.  It worked marvelously!

Nutritious, Guilt Free, Cookie Balls
Cookie Balls

My kids love these.  When I make them, I have to hide some or they’ll gobble them all up.  I make sure to set some aside for my youngest and myself so that we have something allergy-friendly to snack on while the non-allergy big kids have their snacks.

Cookie Balls
Makes 20-24 Cookie Balls
35-40 Chopped Dates
1/3 Cup Cocoa Powder
1 Cup Almond Meal
1/4 Cup Chia Seeds
1 TBSP Coconut Oil
2 TBSP Organic Grass-fed Butter
1/2 Cup Coconut Flakes

Mix all Ingredients, except coconut flakes, until well blended.  Add coconut flakes and mix until blended.  With your hands, take about a tablespoon or two, depending on how big you want them. and roll the mixture into balls.  I like mine to be bite-sized for less mess.  The smaller, the better, for little mouths.  I find they store well for at least a week.  They might last longer, but they are so good that they usually get eaten up before a few days have passed!

Chocolate Pomengratate Pavlova

When the weather gets drier, I love to make meringue cookies.  I decided to try something new when I discovered Pavlovas.  Ohhh my goodness, just looking at one makes my mouth water!  Three layers of crispy meringue frosted with fluffy mounds of whipped cream, sprinkled with shaved chocolate and topped with a tangy fruit, this is one desert guaranteed to please.  The best part is, it is gluten free, corn free and if you use coconut milk for whipped cream, it can even be dairy free!

DSC_0208

When I made this, I thought for sure that we would gobble it up.  Although it is not overpoweringly sweet, it is rich and surprisingly filling!  The children and I agreed that we should share it with our neighbors.  We cut half the cake for them to enjoy, then had the rest for dessert.  😉

DSC_0224

Some desserts get stale or lose flavor as they sit out.  Surprisingly, this is a treat that only gets better with time.  As it sat, the crunchy crust of the meringue softened slightly to become chewy and melted in my mouth that much more.  Who knew?!

As a side note, if you want to save the yolks, you can make mayo too!

Chocolate Pomegranate Pavlova
6-8 large egg whites(1 cup) at room temperature
pinch of cream of tartar
2 cups sugar
3 tbsp cocoa powder
1 pint heavy whipping cream
1/4 cup powdered sugar
1 seeded pomegranate
parchment paper

Directions
1.Preheat oven to 300 degrees.
2.In a large glass or metal mixing bowl, whip egg whites and cream of tartar till peaks form.
3.Slowly add 2 cups of sugar and cocoa till blended.
4.Line 2 cookie sheet with parchment paper.  Place 3 small plates of about 8 inches on parchment paper and lightly trace with a pencil.  Remove plates.
5.Spoon the meringue onto the circles and slowly spread until a nice thick layer is formed.  Extra meringue can be spooned into mini cookies on 2nd cookie sheet.
6.Bake for 60-75 minutes.  Crack oven and let cool.
7.While waiting, blend heavy whipping cream and powdered sugar till fluffy.
8.Carefully remove one giant meringue cookie from parchment and place on platter.
9.Spoon 1/3 whipped cream onto first meringue cookie and spread evenly to edges.
10.Carefully remove second giant meringue cookie from parchment and place on top.
11.Spoon half remaining whipped cream on top of 2nd cookie.
12.Carefully remove last giant meringue cookie from parchment and place on top.
13.Spoon remaining whipped cream on top and spread evenly.
14.Sprinkle with cocoa powder.
15.Top with a generous helping of pomegranate.